
- Introduction
- Description of Terms used in Programming
- Levels of Programming Languages
- Advantages and Disadvantages of Low-level and High-level Languages
- Program Development
- Development of Algorithms
- Program Control Structures
- Designing More Complex Algorithms

Introduction
- Human beings have evolved from the Stone Age to a highly sophisticated and advanced society by inventing things like the wheel, fire, transistors and today's ultra modem devices like computers. The idea of computers started way back in the nineteenth century.
- The first generation computers called Electronic Numeric integrator and Calculator (ENIAC 1) were operated by plugging wires into a control panel that resembles the old telephone switchboards
Computer Programming
- A computer works by executing a set of instructions known as a program. The term programming refers to the process of developing computer instructions (programs) used to solve a particular task. It involves use of special characters, signs and symbols found in a particular programming language to create computer instructions. A programming language is a special set of symbols that can be translated into machine-readable form by the computer when arranged in a particular sequence or order. Each language has a special sequence or order of writing characters usually referred to as syntax.
- It was John von Neumann of Princeton University (USA) who first came up with the proposition to store programs in the computer memory. Perhaps, this was one of the most dramatic developments in the computer history. Why? Because not only did the new stored-program way of computing increase-processing speed but also allowed easy and flexible methods of editing and updating the program.
Description of Terms used in Programming
- Before we go further with programming, it is important to define some common terms used in computer programming.
Source Program
- The term source program refers to the program code that the programmer enters in the program editor window that is not yet translated into machine-readable form. The source program is usually created using a particular programming language as discussed later.
Object Code
- The term object code refers to the program code that is in machine-readable. A source code that is not in machine-readable form must be translated into object code.
Translators
- The term translator is used to refer to language processors such as assemblers, interpreters and compilers that convert the source program into object code.
Assembler
- An assembler translates assembly language into machine language that the computer can understand and execute.
Interpreter
- An interpreter translates the source program line-by-line, allowing the CPU to execute one line before translating the next. The translated line is not stored in the computer memory. It means that every time the program is needed for execution, it has to be translated. This method of translating programs was very common in early computers that did not have enough memory to store the object code as a file that can be executed later
Compiler
- A compiler translates the entire source program into object code: The object code file can be made into a fully executable program by carrying out another process known as linking which joins the object code to all the other files that are needed for the execution of the program. After the linking process, an executable file (application file) is generated. This file is stored on a storage media such as a disk with a name that has a unique extension (.EXE). Examples of executable files are WINWORD.EXE and PM70.EXE used to start Microsoft Word and Adobe PageMaker 7.0 respectively.
The difference between the interpreters and compilers are summarised below:
| Interpreters | Compilers |
| 1. Translates the source program one statement at a time | 1. Translates the entire source code at once before execution |
| 2. Translates the program each time it is run hence slower than Compiling | 2. Compiled program (object code) can be saved on a storage media and run as required, hence executes faster than interpreted Programs. |
| 3. Interpreted object code takes less memory compared to compiled program. | 3. Compiled programs require More memory as the object file are larger. |
Levels of Programming Languages
- Many programming languages have been developed over the years. These languages are classified into two major levels namely:
- Low-level languages
- High-level languages
- These levels are further subdivided into five generations. The first and second generations consist of low-level languages while the third to the fifth generation consist of high-level languages.
Low-Level Languages
- Low-level languages are classified as low because the computer can easily understand them directly or they require little effort to translate into computer understandable form. These languages are hardware oriented and therefore they are not portable i.e. a program written fornone computer cannot be installed and used on another.
- Two types of low level languages are the machine languages and assembly languages.
Machine languages (First generation languages)
- In machine languages, instructions are written using binary logic. Given that data and instructions are in binary form, many lines of code are needed to accomplish even a simple task like adding two numbers. A program written in machine language might look like this:
- It is evident from the above code that it is hard for a person to guess what the program is all about unless they have special knowledge in machine level programming. Furthermore, different CPU's have different machine codes e.g. those for the Intel Pentium processors may differ from Motorola or Cyrix processors. Therefore before decoding the meaning, a programmer has to know for which CPU the program was written. Obviously, such programs are hard to understand from the programmer's point of view, but very easy to execute from the computer's perspective.
Assembly languages (Second generation languages)
- Assembly languages were developed in order to overcome the difficulties of understanding and using machine languages. These languages represented the first successful attempt to make computer languages readable. The languages allowed programmers to write programs as a set of symbolic operation codes called mnemonics. Mnemonics are basically shortened two or three letter words.
- Programs written in assembly language require an assembler in order to convert them into machine language that the computer can understand. Just like the machine languages, assembly languages are also machine dependent and therefore a program written for one computer cannot be used on another.
High-level Languages
- High-level languages are very close to the human language (English like) and they can be read and understood even by people who are not experts in programming. There are many types of high-level languages and each of them was developed to address a particular problem-solving domain while others came about due to advancement in technology. These languages are machine independent. This means that a programmer concentrates on problem solving during a programming session rather than how a machine operates.
- High-level languages can be classified into five groups:
- Third generation languages. (3 GLs)
- Fourth generation languages. (4 GLs)
- Fifth generation languages. (5 GLs)
- Object oriented languages. (OOPs)
- Web scripting languages.
Third generation languages (3 GLs)
- Third generation languages (3 GLs) are also called structured or procedural languages. A procedural language makes it possible to break a program into components called modules each performing a particular task.
- This is referred to as structured programming. The structured programming approach emphasizes the following:
- Large programs can be broken down into smaller sub programs each performing a single task.
- Use of a few simple control structures in problem solving. These control structures include sequence, selection and iteration as covered later in this book.
- Structured programming offers many benefits because it is flexible, easier to read and modify.
Examples of third generation programming languages include:
- Pascal: Pascal was initially developed as an academic language, to help in the teaching and learning of structured programming.
- FORTRAN: (FORmula TRANslator): This language was developed for mathematicians, scientists and engineers. It enables writing of programs with mathematical expressions.
- COBOL: (Common Business Oriented Language): This language is designed for developing programs that solve business problems e.g. developing data processing applications such as computer-based inventory control systems.
- BASIC: (Beginners All-purpose Symbolic Instructional Code): This language was mainly developed to enable students to easily learn programming. Basic is a simple general-purpose language used for developing business and educational applications. Because of its simplicity, it is a powerful tool for students who wish to learn programming. It was the first high-level language that was available for microcomputer users.
- C: This is a programming language mainly used for developing system software such as the operating system. It is one of the most popular and powerful high-level languages in the business world because of its ability to provide the programmer with powerful features of low-level languages and at the same time easily understandable as a high level language.
- Ada: This language was named after the first lady programmer, Ada Lovelace. Ada is suitable for developing military, industrial and real time systems.
A sample program written in Pascal language
- Imagine the task of developing a program that would solve the equation of a straight line given by the algebraic expression: Y = MX + C.
- To enter the program code below in Pascal, proceed as follows:
- From Windows explorer, locate a folder called TP and open it.
- From the TP folder select BIN
- From BIN window, double click a file named turbo.EXE. Pascal program window is displayed on the screen.
- Enter the program code exactly as it is but ignore the numbering.
1. Program Straight Line (Input, Output);
2. Var
3. y, m, x, c: Integer;
4. Begin
5. Writeln ('Input the value of m');
6. Readln (m);
7. Writeln ('Input the value of x');
8. readln (x);
9. Writeln ('Input the value of c ');
10. Readln (c);
11. Y: = m * x + c;
12. Writeln (The value of y is:’, y);
13. End.
Explanation
- Line 1: This is the program header. The word "Program" indicate the beginning of the program whose name is Straight-Line. The (input, output) statements shows that the program will expect some input from the keyboard and display the output on the screen.
- Line 2: Var is short form for variable. A variable is a location for data in the computer memory. This statement tells the computer that variables are about to be declared. When a variable is declared, the computer sets aside some memory space to store a value in the variable.
- Line 3: F our variables have been declared of type integer. This means that the memory spaces that will be set aside can only hold values that are whole numbers.
- Line 4: The Begin statement shows that this is the start of the program body. The computer executes statements in this section. For example, the execution starts by asking the user to input the value of m.
- Line 5: The writeln statement displays whatever is in the brackets on the screen. Notice that the statements in brackets are written between inverted commas. The string will be sent to the screen exactly the way it appears in the brackets. If you wish to display the value held in a variable on the screen, then you have to remove the inverted comma's and write the name of the variable in the brackets e.g. writeln (y) will display the value held in the variable y.
- Line 6:The read or readln statement reads a value and stores it in a variable. When the program is running, a read/readln statement in the code will display a blinking cursor that indicates to the user where to type the input.
- Line 11: Calculates the value of y. Notice the symbol’: ='. In Pascal! This is called the assignment statement. The values on the righ1 are calculated then stored in the variable y, which is on the left of the assignment symbol.
- Line 12: The writeln displays the value stored in yon the screen. Notice that y is not within the inverted commas. If you gave the value of m as 10, x as 2 and c as 20 then the following should appeal on your screen: The value of y is: 40.
- This is because the statements between the inverted comma’ are meant to make the output readable on the screen. Otherwise: only the value 40 would have been displayed. - Line 13: The 'End.' statement shows the end of a program.
Fourth generation languages (4 GLs)
- Fourth generation languages make programming an even easier task that the third generation languages because they present the programmer with more programming tools. Examples of such tools include command buttons, forms etc. With the advent of these languages, gone are the days when a person had to write lines upon lines of code. Instead, the programmer selects graphical objects on the screen called controls then uses them to create designs on a base form.
- The programmer may also use an application generator that works behind the scenes to generate the necessary code; hence the programmer is freed from the tedious work of writing the code.
Examples of fourth generation languages are: Visual Basic, Delphi Pascal and Visual COBOL.
A sample form designed using Visual basic programming language
- The programmer in this case simply picks a tool from the toolbox and uses it to create objects such as command buttons, textboxes etc. on the form by dragging the mouse pointer on the form during design.
Fifth generation languages (5 GLs)
- Fifth generation languages are designed around the concept of solving problems by enabling the computer to depict human like intelligence. These programs are designed to make the computer solve the problem for the programmer rather than the programmer spending a lot of time to come up with the solution. With such languages, the programmer only worries about what problem needs to be solved and what conditions need to be met without worrying about how to implement an algorithm to solve them. Examples of these languages are those used in artificial intelligence like PROLOG, Mercury, LISP and OCCAM.
Object-oriented programming languages (OOP)
- The idea behind object-oriented programming (OOP) was developed in the 1960's but its significance was not appreciated until lately. The concept behind object oriented programming languages is to look at a program as having various objects interacting to make up a whole. Each object has specific data values that are unique to it (called state) and a set of the things it can accomplish called (functions or behavior). This process of having data and functions that operate on the data within an object is called encapsulation. Several objects can then be linked together to form a complete program. Examples of object-oriented languages include Simula, which was developed in the 1960's. However, C++, Java and SmallTalk are contemporary languages in this range. Although Java is sometimes associated with development of web sites it can be used to create whole application programs that do not need a web browser to run. OOP has contributed greatly to the development of graphical user interface operating systems and application programs.
Web Scripting languages
- Web scripting languages are used to develop or add functionalities on web pages. Web pages are hypertext documents created in a language called Hypertext Markup Language (HTML).
- The language simply consists of tags that are interpreted by the web browser software to display text when the HTML file is opened on the screen by a web browser software. A tag is a special word enclosed between the less than and greater than (<>) symbols and the browser can interpret it as a command. For example, to start a HTML page, one must use the <HTML> tag at the very top of the document. Other languages like Extended HTML (XML) have been derived directly from HTML with the only difference being that XML allows the user to define their own tags instead of using the standard HTML tags.
- Unlike other programming languages, HTML does not have the declaration part and control structures (to be covered later in the book). Due of this reason, it is not considered as a true programming language.
- Due to its simplicity, HTML has many limitations and cannot be used alone when it comes to developing functional websites. Some special blocks of code known as scripts may be inserted in HTML pages using scripting languages like JavaScript, VBScript and Hypertext Preprocessor (PHP) in order to add functionality to the HTML page.
- A script is a small program fragment, written in a different language other than HTML but inserted into the HTML program.
- Most HTML tags have an opening tag and a closing tag. An opening tag is enclosed between < > while a closing one between </ >.
- Text that is to be displayed on the screen is enclosed between an opening and closing tag. For example, the statement <B> Hello </B> will display the word "Hello" in boldface on the screen.
- Table below shows examples of HTML tags and their meanings:
| Tag | Meaning |
| 1. <HTML></HTML> | Marks the beginning and end of a HTML document. All other tags and text fall between these two tags. |
| 2. <HEAD> </HEAD> | Marks the header part of the document. |
| 3. <TITLE> </TITLE> | Gives title of the web page. Text between this tags appears in the title bar when the page is browsed. |
| 4. <BODY></BODY> | Marks the body part of the document. |
| 5. <CENTER></CENTER> | Centres text and objects on the web page. |
| 6. <B></B> | Bolds the text on the web page. |
| 7. <I></I> | Italicise the text. |
| 8. <H!></H!> | Sets size of text on the web page with H6 displaying the smallest and H1 the largest Size. |
Creating a script using Javascript
- Javascript is a popular scripting language. Before writing your HTML program with a script inserted, make sure that you have the latest browser software installed on your computer. Older browsers may not have support for Javascript. If you are using Internet Explorer, it should be version 5.0 and above.
- Open Notepad and key in the following program. Do not write the numbers to the left of each line of code.
1. <HTML>
2. <HEAD>
3. <TITLE> Scripting Example </TITLE>
4. </HEAD>
5. <BODY>
6. <H1> <CENTER> <B> We are the world </B> </CENTER> </H1>
7. <SCRIPT>
8. document.write ('My name is strongman');
9. alert ('congratulations for succeeding to run this script');
10. </SCRIPT>
11. </BODY></HTML> - After typing the entire program, save your file on the desktop as Example.html and then close the notepad. Notice that the icon to your file on the desktop look like that of the default web browser in your computer.
- To view the web page, double click the icon of the file Example .html on the desktop. The figures below shows the results after you run the script.
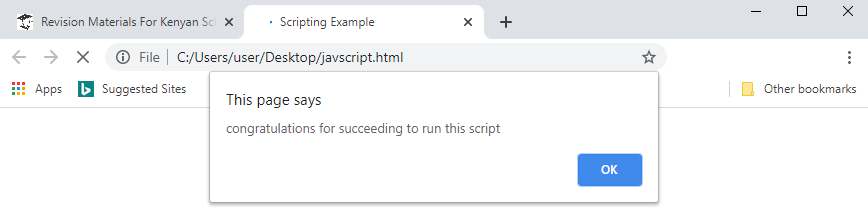
- After clicking ok the following information is disabled

Explanations
- Line 1: The tag <HTML> marks the beginning of the HTML document.
- Line 3: The <TITLE> </TITLE> tags show the title of the web page. The text between this tags will appear in the title bar of the running HTML document as can be seen in Figure above Notice that the title is written in the header section i.e. between <HEAD> and </HEAD> tags.
- Line 5: It marks the beginning of the body section. Anything between <BODY> and </BODY> will be executed and displayed when the webpage starts running.
- Line 6: This line will display the text "We are the world" on the screen. The text will be large i.e. size H1 and it will be centred on the screen. The text will also be bolded.
- Line 7: It marks the start point of the script. Old JavaScript examples may use a type attribute: <script type="text/javascript">. which tells the browser that the script will be written in JavaScript language. The type attribute is not required. JavaScript is the default scripting language in HTML.
- Line 8: The statement Document. Write tells the browser using JavaScript to write whatever is in the brackets. Notice that in JavaScript, the end of a statement is marked by a semicolon (;).
- Line 9: The word alert displays a message box on the screen with an OK button. Clicking the button makes the message box to disappear. The text in the brackets appears in the dialog box.
- Line 10: Closes the script.
- Line 11: Marks the end of the body and the HTML code.
Practical activity
- Open a text editor program on your computer like NotePad or WordPad.
- Type the following program exactly the way it is in the editor:
<HTML>
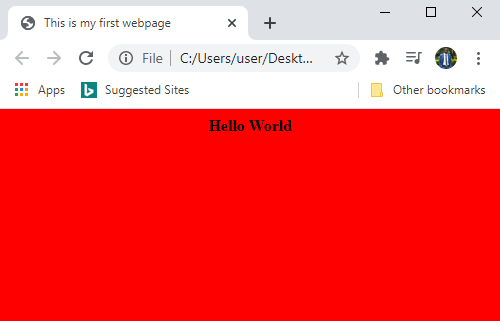
<HEAD><TITLE> This is my first webpage</TITLE></HEAD> <BODY bgcolor = "red" >
<H1><CENTER><B>Hello World</B></CENTER></H1>
</BODY> </HTML> - Save your work as webpage i.e with the .html extension on the desktop. Make sure that the Save As Type box reads "All Files" before clicking the save button in order to avoid saving a text file with two extensions i.e. webpage.html.txt
- Close your text editor. Notice that your file on the desktop has the icon of the default web browser installed on your computer. Double click it to view the web page! Figure below shows a sample of the display expected when the file is loaded to the browser. If you have a colour monitor, it should look as below.
- Check your program and change your background to blue, save then click the refresh button. What happens?
Advantages and Disadvantages of Low-level and High-level Languages
- Having looked at the various programming languages, it is important to identify the advantages and disadvantages associated with each level of programming languages.
Advantages and Disadvantages of Low Level Languages
Advantages
- The CPU understands machine language directly without translation.
- The processor executes them faster because complex instructions are already broken down into smaller simpler ones.
- Low level languages are stable and hardly crash or break down once written.
Disadvantages
- Low level languages are difficult and cumbersome to use and learn.
- They require highly trained experts both to develop and maintain programs.
- Removing errors (debugging) in low level language programs is difficult.
- Low level programs are machine dependent i.e. they are not transferable from one hardware or software platform to another. Hence we say they are not portable.
Advantages and Disadvantages of High Level Languages
Advantages
- High level languages are portable i.e. they are transferable from one computer to another.
- High level languages are user friendly and easy to use and learn.
- High level languages are more flexible; hence they enhance the creativity of the programmer and increase productivity in the workplace.
- High level languages are far much easier to correct errors (debug).
Disadvantages
- Their nature encourages use of many instructions in a word or statement hence the complexity of these instructions causes slower program processing.
- They have to be interpreted or compiled to machine readable form before the computer can execute them.
Program Development
- The process of program development is not an easy task. Remember that in our definition of programming, we said that the program must solve a particular problem or accomplish a task.
- Hence, before developing a program, the requirements of the eventual users and its expected functions should be fully understood.
Program development can be broken into the following stages:- Problem recognition.
- Problem definition.
- Program design.
- Program coding.
- Program testing and debugging.
- Implementation and maintenance.
- The completion of one stage leads to the beginning of the next. At the same time, some stages have to be continuously reviewed in light of the step just before them to make sure that they meet the requirements. For example, after coding, the code has to be compared to the design to see whether it meets the design specification. Therefore, this method becomes very expensive if the correct requirements are not identified at each stage before the next is initiated.
- It is important to note that although some people consider documentation as an independent stage, it is done at all stages of the program development lifecycle as shown in Figure 3.5.
- This is important so that the facts are recorded when they are still fresh and in the required detail by the programmer.
Problem Recognition
- Problem recognition refers to the understanding and interpretation of a particular problem. In order to understand a problem you need to look for the key words such as compute, evaluate, compare etc. You can then rewrite the problem in a more simplified way using the keywords.
- A programmer identifies problems in the environment and seeks to solve them by writing a computer program that would provide the solution. Many of the privileges of automation that we enjoy today are as a result of people who wrote computer programs to do the tasks. For example, the intelligent control of traffic lights, the autopilot in aircraft and the use of robots in industry are good examples where problems were recognised and the computer was used as a tool to solve them. Think of the person who after seeing the tedious nature of typing using a manual typewriter decided to develop a word processor program!
- In any given circumstance, the following three situations can cause the programmer to identify a problem that is worth solving:
- Problems or undesirable situations that prevent an individual or organisations from achieving their purpose.
- Opportunity to improve the current program. It can be argued that any unexploited opportunity is a problem.
- A new directive given by the management requiring a change in the status quo.
Sample problem
Consider a mathematical problem such as calculating the area of a circle. In this case, the problem is finding the area of a circle. As a programmer, it will be your interest to develop a program that can be used to calculate the area of any circle. The equation for calculating the area of a circle is given by A = лr2.
Problem Definition
- In problem definition, also referred to as problem analysis, the programmer tries to determine or define the likely input, processing activities and the expected output using the keywords outlined at the problem recognition stage.
- At the end of this stage, the boundaries of the expected program will have been established i.e. a clear view of what the program needs to accomplish must be in place. In case, several methods are identified that can be used to solve the same problem, then the best alternative should be chosen.
- In our problem of calculating the area of a circle, an investigation reveals that the parameters needed to determine the area of any circle are:
- Input:
- Pie (л) which is a constant.
- The radius of the circle.
- Process: The formula of calculating area of a circle which is л x radius x radius.
- Output: The area of the circle (A).
- Input:
- The problem definition stage ends with the writing of a requirements report or document for the new program. It is this document that enables a programmer to come up with a program design that meets the needs at hand.
Program Design
- Program design is the actual development of the program's processing or problem solving logic called the algorithm. An algorithm refers to a limited number of logical steps that a program follows in order to solve a problem. It is the programmer who will usually come up with the algorithm after carefully analysing the requirements specification. Many programs are not usually made up of one large block of code i.e. they are not monolithic. Instead, several units called modules work together to form the whole program.
- In modular programming, each module performs a specific task. This approach makes a program flexible, easier to read and carry out error correction.
- The design phase enables the programmer to come up with models of the expected program. The models show the flow of events and data throughout the entire program from the time data is input to the time the program gives out expected information. The development of algorithms is covered later in the chapter.
Program Coding
- Program coding is the actual process of converting a design model into its equivalent program.
- This is done by creating the program using a particular programming language. The end result of this stage is a source program that can be translated into machine readable form for the computer to execute and solve the target problem. Programs can be written in many different languages but the general trend in the world today is to use programs that are easy to learn and understand such as, Pascal, C++, Visual Basic and Java. Below is a comparison of the same program written in Pascal and C++ used to calculate the area of a circle.
| Program in Pascal | Program in c++ |
| Program AreaCircle (input, output); Const Pi = 3.142; Var Radius, Area: real; Begin Writeln ('Enter the radius'); Readln (radius); Area: = Pi *Radius *Radius; Writeln ('The area is', Area) End. |
#include<iostream.h> main ( ) { double radius, area; const double pi = 3. 142; cout«"Enter the radius"« "\n"; cin»radius; area = pi *radius * radius; cout«"The area is"« area «"\n"; return 0; } |
NB: Use lowercase when coding using C++.
Going through the two programs, you will realise that they are fairly similar, irregardless of the
language that was used to code them. The table below explains the program codes.
| Pascal code | C++ code | Explanation |
| Program AreaCircle (input, output); |
#include<iostream.h» | The header of the programs. The statements in ( ) and < > shows that the user inputs data via the keyboard and the program display information on the screen. |
| Const Pi = 3.142; | double pi = 3.142; | A constant has been declared with a name pi and value 3.142. |
| Var radius, area:real |
double area, radius; | Real variables with fractional parts have been declared. |
| Begin | { | Marks the beginning of the program body or c++ function |
| Writeln ('Enter the radius'); |
cout< <"Enter radius"; | Displays on the screen the string between inverted commas |
| Readln (Radius) | cin> >radius; | Displays a blinking cursor that tells the user that an input is needed before the program can continue. |
| Area: = Pi*Radius *Radius; | area = pi*radius * radius; |
Calculates the area. Notice the assigment statement in Pascal is : = while in C++ it is = |
| Writeln ('The area is' Area)' |
cout< <"The area is" area « "\n"; |
Display the value stored in the variable Area. |
| End. | return 0; } |
Marks the end of the program |
NB: “\n" is a C++ syntax of directing the character to a new line. It is equivalent to PASCAL’s
"In" used in writeln and readln.
Program Testing and Debugging
- After coding, the program has to be tested and the errors detected corrected (debugged).
- There are two types of errors (bugs) that can be encountered when testing a program. These are:
- Syntax errors: These errors emanate from improper use of language rules e.g. grammar mistakes, punctuation; improper naming of variables and misspelling of user defined and reserved words. Reserved words are those words that have a special meaning to the programming language and should not be used by the programmer for anything else. These errors are detectable by the translator and must be corrected before the program runs.
- Logical errors: They are not detectable by the translator. The program runs but gives wrong output or halts during execution. Such errors that occur during program execution are sometimes called runtime or execution errors.
Methods of error detection
- There are several methods of testing the program for errors. These include:
- Desk checking (Dry-run)
- It involves going through the program while still on paper before entering it in the program editor. This helps the programmer to detect the most obvious syntax and logical errors. - Using debugging utilities
- After entering the program in the program editor, you can run the debugging utilities during translation to detect syntax errors in order to correct them before execution. - Using test data
- The programmer carries out trial runs of the new program. At each run, the programmer enters various data variations and extremes including data with errors to test whether the system will grind to a halt. For example, if the input required is of numeric type, the programmer may enter alphabetic characters to see whether the program will grind to a halt unexpectedly. A good program should not crash due to incorrect data entry but should inform the user about the anomaly and request for the entry of the correct data.
Implementation and Maintenance
Implementation
- Implementation refers to the actual delivery and installation of the new program ready for use.
- New programs will obviously change the way things are done when implemented hence the need for review and maintenance.
Review and maintenance
- Review and maintenance is important because of the errors that may be encountered after the program has been implemented or exposed to extensive use. A program may also fail not because of poor development but also due to poor use. Therefore proper training and post implementation support of users will always reduce the chances of having them entering invalid data that can crash the program.
Program documentation
- Program documentation is the writing of support materials explaining how the program can be used by users, installed by operators or modified by other programmers. All stages of program development should be documented in order to help during future modification of the program.
- Documentation can either be internal or external. Internal documentation, is the written nonexcutable lines (comments) in the source program that help other programmers to understand the code statements. External documentation refers to reference materials such as user manuals printed as booklets. User manuals are common examples of external documentation
- There are three target groups for any type of documentation:
- User oriented documentation. These type enables the user to learn how to use the program as quickly as possible arid with little help from the program developer.
- Operator oriented documentation. It is meant for computer operators such as the technical staff. It helps them to install and maintain the program.
- Programmer oriented documentation. It is a detailed documentation written for skilled programmers. This documentation provides necessary technical information to help in future modification of the program. In this type of documentation, all stages of the program development should be documented because.
- There may come a need to revise or modify the program.
- Other programmers may think of ways of improving your program.
Development of Algorithms
- As defined earlier an algorithm can be defined as a limited number of logical steps that a program follows in order to solve a problem. In most cases, algorithms can be depicted using a number of tools such as decision tables, decision tree's, flowcharts and pseudocodes.
- In this notes, we shall mainly discuss program flowcharts and pseudocodes because they are the most widely used by programmers.
Pseudocode
- As mentioned earlier, a pseudocode is a set of statements written in a readable language (usually English-like phrases) but expressing the processing logic of a program. Some of the words used in a pseudocode may be drawn directly from a programming language and then mixed with English to form structured statements that are easily understood by non-programmers and also make a lot of sense to programmers. However pseudocodes are not executable by a computer.
Guidelines for designing a good pseudocode
- The statements must be short, clear and readable
- The statements must not have more than one meaning i.e. should be unambiguous
- The pseudocode lines should be clearly outlined and indented clearly.
- A pseudocode should show clearly the start and stop of executable statements and the control structures (to be discussed later in the section).
- The input, output and processing statements should be clearly stated, using keywords such as PRINT, READ, INPUT etc. Below are some examples that demonstrate how to write a pseudocode.
Example 1
Write a pseudocode that can be used to prompt the user to enter two numbers, calculate the sum and average of the two numbers and then display the output on the screen.
Solution
START
PRINT "Enter two numbers"
INPUT X, Y
SUM = X + Y
AVERAGE = SUM/2
PRINT SUM
PRINT AVERAGE
STOP
Example 2
Write a structured algorithm that would prompt the user to enter the length and width of a rectangle, calculate the area and perimeter then display the result.
Solution
- First draw the rectangle of length (L) and width (W)
- Write down the pseudocode
START
PRINT "Enter length and width":
READ L, W
AREA = L * W
PERIMETER = 2(L + W)
PRINT AREA
PRINT PERIMETER
STOP
Example 3
Write a pseudocode for a program that can be used to classify people according to age. If a person is more than 20 years; output "Adult" else output "Young person"
Solution
START
PRINT "Enter the age" INPUT AGE
IF AGE> 20 THEN
PRINT "Adult"
ELSE
PRINT "Young person"
Program Flowcharts
- A Flowchart is constructed using a set of special shapes (or symbols) that have specific meaning.
- Symbols are used to represent operations, or data flow on a flowchart.
- Each symbol contains information (short text) that describes what must be done at that point.
- The symbols are joined by arrows to obtain a complete Flowchart. The arrows show the order in which the instruction must be executed.
Symbols Used in Program Flowcharts.
- Below is a standard set of symbols used to draw program flowcharts as created by American National Standard Institute (ANSI)
- Terminal symbol.
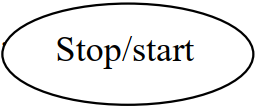 Ellipse (Oval in shape)
- It is used to indicate the point at which a flowchart, a process or an algorithm begins & ends.
- All Flowcharts must have a START & STOP symbol. The START/BEGIN symbol is the first symbol of a flowchart, & identifies the point at which the analysis of the flowchart should begin. The STOP/END symbol is the last symbol of a flowchart, & indicates the end of the flowchart.
- The words Begin & End (or Start & Stop) should be inserted in the Terminal symbol.
- Input or Output symbol.

- It is used to identify/specify an input operation or output operation.
For example; - Input operation Output operation
Note. The words mostly associated with I/O operations are READ & PRINT. READ describes the entry of computer data, while PRINT relates to the printed output of information.
- It is used to identify/specify an input operation or output operation.
- Process symbol.

- Process symbol is used to indicate that a processing or data transformation is taking place.
- The information placed within the process symbol may be an algebraic formula or a sentence to describe processing.
- Processing defined as a Formula Processing defined as a Sentence
- Decision symbol.
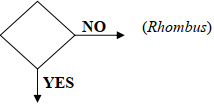
- It is used to indicate/ specify a condition or to show the decision to be made.
- There are 2 main components of a Decision symbol:
- A question asked within the Decision symbol, that indicates the comparison/logical operation.
- The results of the comparison (which are given in terms of YES or NO). The arrows labeled YES or NO lead to the required action corresponding to the answer to the question.
- Flow lines.
- Flow lines with arrowheads are used to indicate the direction of processing of the program logic, i.e., they show the order in which the instructions are to be executed.
- The normal flow of a flowchart is from Top to Bottom, and Left to Right.
Note. Flow lines should never cross each other.
- Connector symbol.

- Sometimes, a flowchart becomes too long to fit in a single page, such that the flow lines start crisscrossing at many places causing confusion & also making the flowchart difficult to understand.
- The Connector symbol is used as a connecting point for arrows coming from different directions.
- A Connector symbol is represented by a Circle, and a letter or digit is placed within the circle to indicate the link.
Note. Connectors do not represent any operation. They are used to connect two parts of a flowchart, indicating that the flow of data is not broken.
General guidelines for drawing a program flowchart.
- A flowchart should have only one entry/starting point and one exit point (i.e., ensure that the flowchart has a logical start and finish).
- The flowchart should be clear, neat and easy to follow.
- Use the correct symbol at each stage in the flowchart.
- The flowchart should not be open to more than one interpretation.
- Avoid overlapping the lines used to show the flow of logic as this can create confusion in the flowchart
- Make comparison instructions simple, i.e., capable of YES/NO answers.
- The logical flow should be clearly shown using arrows.
Note. A flowchart should flow from the Top to Bottom of a page, and from the Left to the Right. - Where necessary, use Connectors to reduce the number of flow lines. Connectors are helpful when a flowchart is several pages long, and where several loops are needed in the logic of the flowchart.
- Check to ensure that the flowchart is logically correct & complete.
Example 1:
Draw a flowchart for a program that can be used to prompt the user to enter two numbers, find the sum and average of the two numbers and then display the output on the screen.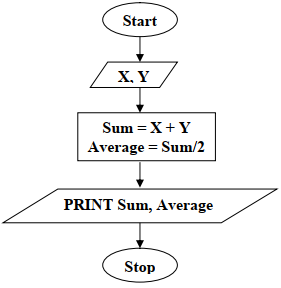
Example 2:
Draw a flowchart for a program that would prompt the user to enter the Length and Width of a rectangle, calculate the Area and Perimeter, then display the result.
Example 3:
Draw a flowchart for a program that can be used to calculate the Diameter, Circumference and Area of a circle and then display the output on the screen.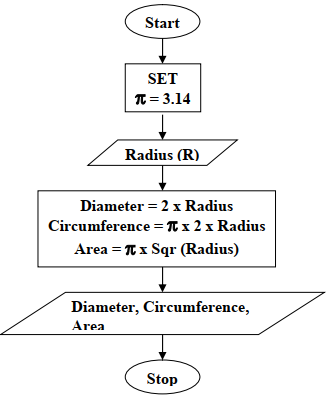
Example 4:
Design a flowchart for a program that can be used to classify people according to age. If a person is more than 20 years; output “Adult” else output “Young person”.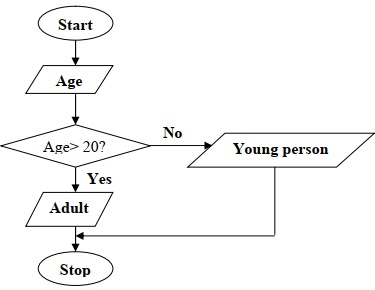
Example 5:
Draw a flowchart for a program that would be used to classify animals according to sex. If a letter M is input, the program should display ‘Male’ otherwise it should display “Female”.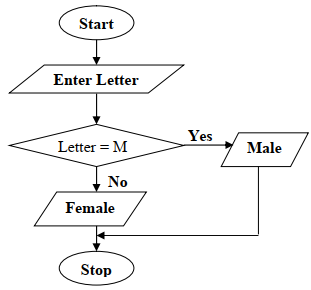
Example 6:
Write a program using a flowchart to convert temperature from 0C to 0F.
Fahrenheit =32 + (9o x C/5).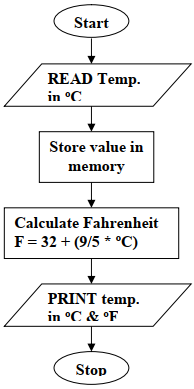
Notes.
- A flowchart must have a Start and an end.
- A flowchart is useful when the algorithm is short & the flowchart can fit conveniently on a single page. If the flowchart is too large, it is recommended to use Pseudocodes for long & complicated programs.
Advantages of using Flowcharts.
The following are the benefits of Flowcharts:
- Quicker understanding of relationships.
- They assist programmers to understand procedures more quickly.
- A programmer can represent a lengthy procedure more easily with the help of a flowchart than describing it by means of written notes. - Effective synthesis.
- Flowcharts may be used as working models in the design of new programs and systems. - Proper program documentation.
- Program flowcharts serve as good program documentation, which is needed for the following reasons:- If programs are modified in future, the flowcharts will direct the programmer on what was originally done.
- When staff changes occur, the flowcharts may help new employees understand the existing programs.
- Flowcharts assist in program conversion when new hardware/software are acquired.
- Effective coding.
- Program flowcharts act as a guide during the program preparation stage. Instructions coded in a programming language may be checked against the flowchart to ensure that no steps are omitted. - Orderly debugging and testing of programs.
- Flowcharts help in detecting, locating and removing mistakes.
- The programmer can refer to the flowchart as he/she re-checks the coding steps, & the logic of the written instructions. - Efficient program maintenance.
- Flowcharts facilitate the maintenance of operating programs. They help the programmer to concentrate on the part of the information flow which is to be modified.
Limitations of using Flowcharts.
- Flowcharts are complex, clumsy & become unclear, especially when the program logic is complex.
- If changes are to be made, the flowchart may require complete re-drawing.
- Reproduction of flowcharts is usually a problem, since the flowchart symbols cannot be typed.
- No uniform practice is followed for drawing flowcharts as it is used as an aid to the program.
- Sometimes, it becomes difficult to establish the link between various conditions, and the actions to be taken upon a particular condition.
Program Control Structures
- Program control structures are blocks of statements that determine how statements are to be executed. In structured programming languages, there are three control structures namely; sequence, selection and iteration (looping).
Sequence
- In sequence control structure, the computer reads instructions from a program file starting from the first top line and proceeding downwards one-by-one to the end. This is called sequential program execution.

- Therefore, sequential program execution enables the computer to perform tasks that are arranged consecutively one after another in the code. However, most programs that solve real world problems need to enable the computer either to repeat tasks or to make decisions when certain conditions are true or false hence the need for selection and iteration.
Selection
- In selection control, execution of statements depends on a condition that returns true or false.
- The condition must be a boolean expression. One example of a boolean expression is x > = 20.
- In such a case the condition is true if x is equal to or greater than 20. Any other value that is less than 20 is therefore false.
- Generally, the four types of selection controls used in most high-level programming languages are:
- IF... THEN.
- IF ... THEN ... ELSE.
- Nested IF.
- CASE selection.
- In this notes, we shall demonstrate how to implement these controls by using both pseudocodes and flowcharts.
IF ... THEN
- IF ... THEN selection is used if only one option is available. In this case, all other options are ignored.
- The general format of the IF-THEN structure is:
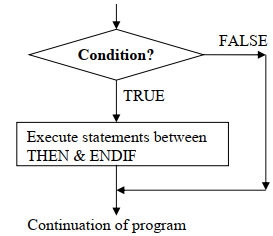
IF < Condition > THEN
Program statement to be executed if condition is true;
ENDIF - The diagrammatic expression of the IF-THEN structure is:
- For example, in a school environment, the administration may decide to reward only those students who attain a mean mark of 80% and above. Therefore, if a students attains 80% and above, he or she is rewarded while the rest are ignored. The following pseudocode and flowchart illustrate this condition:
Pseudocode
IF Mark > 80 THEN
Print “ Give reward”
ENDIF
Flowchart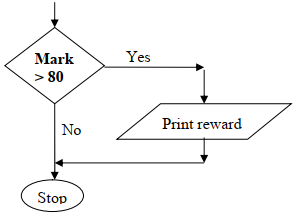
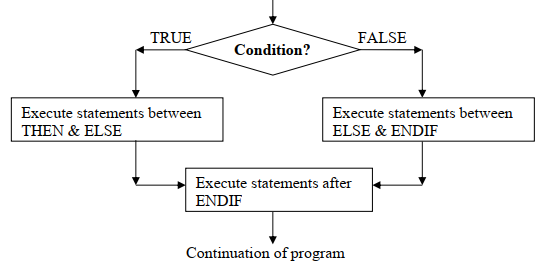
IF ... THEN... ELSE
- IF ... THEN... ELSE selection is suitable when there are two available options. .
- The general format of the IF-THEN-ELSE structure is:
IF < Condition > THEN
Statement 1; (called the THEN part)
ELSE
Statement 2; (called the ELSE part)
ENDIF (indicates the end of the control structure) - The diagrammatic expression of the IF-THEN-ELSE structure is:
Example
In a football match, if a player does a mistake which is considered serious by the rules of the game, he/she is given a red card. Otherwise, he/she is given a yellow card. The algorithms below illustrates this situation using the IF ... THEN... ELSE selection
Pseudocode
IF Fault = Serious THEN
Print “ Give red card”
ELSE
Print “ Give Yellow card”
ENDIF
Flowchart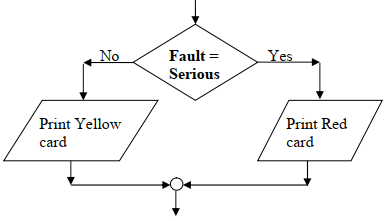
Nested IF selection
- Nested IF selection is used where two or more options have to be considered to make a selection.
- The general format of the Nested IF structure is:
IF < Condition 1 > THEN
Statement 1
ELSE
IF < Condition 2 > THEN
Statement 2
ELSE
IF < Condition 3 > THEN
Statement 3
ELSE
Statement 4;
ENDIF
ENDIF
ENDIF
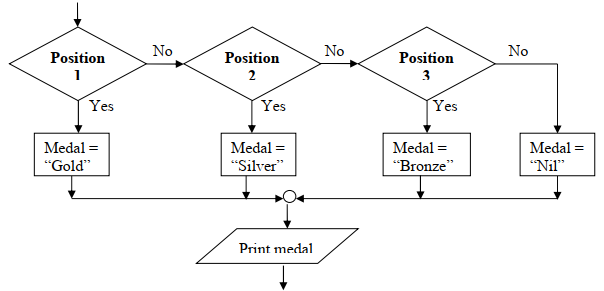
Example
In an Olympics track event, medals are awarded only to the first three athletes as follows:
- Position 1.Gold medal
- Position 2: Silver medal
- Position 3: Bronze medal
Pseudocode
IF position = 1 THEN
medal = "Gold"
ELSE
IF position = 2 THEN
medal = "silver"
ELSE
IF position = 3 THEN
medal = "bronze'
ELSE
medal = "nil"
END IF
ENDIF
ENDIF
Flowchart extract
CASE Selection
- CASE selection is an alternative to the Nested IF especially where there are several options to choose from.
- This selection is preferred to the Nested IF in order to reduce the many lines of code.
- However, it is important to note that the boolean expression for the case selection can only be expressed using integers and alphabetic characters only.
- Generally the boolean expression should be CASE integer OF or CASE Char OF as illustrated in the example below. In this case, average must be an integer.
Pseudocode
CASE average OF
80..100: Grade = 'A'
70.. 79: Grade = 'B'
60.. 69: Grade = 'C'
50.. 59: Grade = 'D'
40 .. 49: Grade = 'E'
ELSE
Grade = 'F'
ENDCASE
Flowchart extract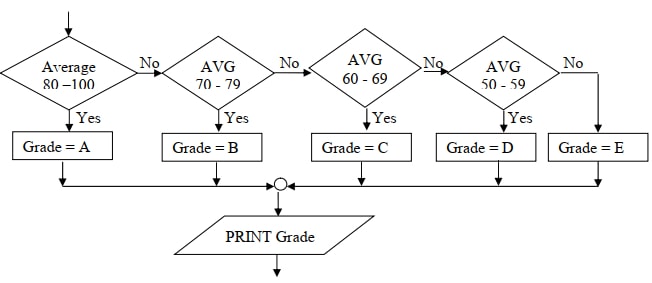
General format of case
CASE x OF
Label: statement
Label 2: statement 2
Label 3: statement 3
Label n: statement n -1
ELSE
statement
ENDCASE
- Note that the flowchart is not different from that of the Nested IF construct
Iteration (Looping)
- Iteration, also referred to a looping or repetition is designed to execute the same block of code again and again until a certain condition is fulfilled. Iteration is important in situations where the same operation has to be carried out on a set of data many times. For example, assume that you are writing a program that will use the same formula to calculate the average marks of three subjects for each student in a class and that the student records are stored in a computer file.
- To calculate the average score for each student in a class, the program should repeatedly read record by record from the file, and then use the formula after each read operation to calculate the average.
- Generally, the three main looping controls are:
- The WHILE loop
- The REPEAT. .. UNTIL loop
- The FOR loop
Types of loops
- Conditional loop: - This is where the required number of repetitions is not known inadvance.
- Conditional execution is a situation that requires that a logical test be carried out, and then a particular action be taken depending on the outcome of that test. - Unconditional loop: - This is where the execution of the instructions is repeated some specified number of times.
- Continuous (infinite/unending) loop: - This is where the computer repeats a process again and again, without ending.
The WHILE loop
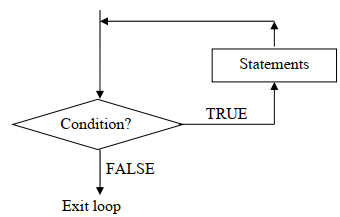
- The 'WHILE' loop is used if a condition has to be met before the statements within the loop are executed. Therefore, this type of loop allows the statements to be executed zero or many times.
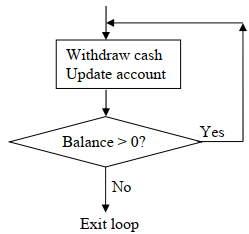
- For example in banking, to withdraw money using an automated teller machine (ATM) a customer must have a balance in his/her account.
- This scenario can be represented as follows using an algorithm
Pseudocode segment
WHILE balance > 0 Do
Withdraw cash
Flowchart extract
Update account
END WHILE
Withdraw cash Update account
Flowchart

In our case above,
- The condition balance> 0 is first tested.
- If it is true, the account holder is allowed to withdraw cash.
- The program exits the loop once the balance falls to zero.
In general, the WHILE loop can be represented using a pseudocode and a flowchart extract as shown below.
Pseudocode segment
WHILE < condition> DO
statements
ENDWHILE
Flowchart extract
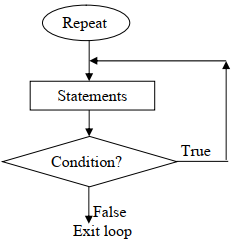
The REPEAT ... UNTIL loop
- Unlike the 'WHILE' loop, REPEAT... UNTIL allows the statements within it to be executed at least once since the condition is tested at the end of the loop. For example, consider the ATM cash withdrawal case discussed under the 'WHILE' loop. If the REPEAT ... UNTIL is used, then the client will be able to withdraw the cash at least once since availability of balance is tested at the end of the loop as shown below.
Pseudocode
REPEAT
Withdraw cash
Update account
UNTIL balance > 0;
Flowchart
The general format of the REPEAT. .. UNTIL loop is;
Pseudocode
REPEAT
Page 46 of 117
statements
UNTIL < condition>
Flowchart
The FOR loop
- The FOR loop is used in circumstances where execution of the choosen statements has to be repeated a predetermined number of times.
- For example, consider a program that can be used to calculate the sum of ten numbers provided by the user.
- The 'FOR' loop can be used to prompt the user to enter the 10 numbers at most ten times.
- Once the numbers have been entered, the program calculates and displays the accumulated sum. The loop is predetermined because it has to be repeated 10 times as shown by the algorithms below.
Pseudocode
FOR count = 1 to 10 DO
PRINT "Enter a number (N)"
INPUT N
Sum=Sum+N
END FOR
Display SUM
Flowchart
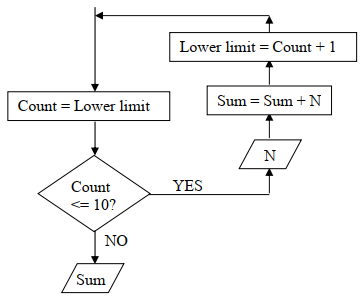
Explanation
- The FOR loop in the problem above functions as follows:
- The loop variable (count) is first initialised to the lower limit, in this case a value of 1.
- The lower limit is then tested against the upper limit whose value is set at 10.
- If the lower limit is less than or equal to 10, the program prompts the user to enter a number N, otherwise the computer exits the loop.
- After the last statement in the loop has been executed, the loop variable count is incremented by a 1 and stored in the lower limit i.e. lower limit = count + 1.
- The lower limit is then stored in count and step (2) is repeated
- The FOR loop can also be used to count downwards from the upper limit to the lower limit. For example, in the above problem, the upper limit 10 can be tested against the lower limit 1 as follows.
FOR count = 10 DOWN TO 1 DO
- Therefore the general format of the FOR loop can be represented using two sets of algorithms.
- Pseudocode for 'FOR' loop that counts from the lower limit
FOR loop variable = lower limit To upper limit DO.
statements
ENDFOR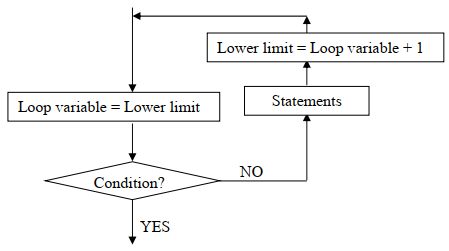
- Pseudocode for a 'FOR' loop that counts from the upper limit down to the lower limit
FOR loop variable = Upper limit DOWN TO Lower limit DO
statements;
ENDFOR.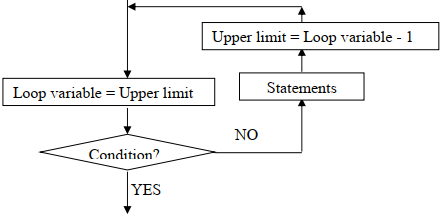
Designing More Complex Algorithms
- The following examples demonstrates how to design more complex algorithms based on what has been covered previously. This is aimed at helping a beginner programmer understand how control structures are used to design logically correct algorithms.
Example 1
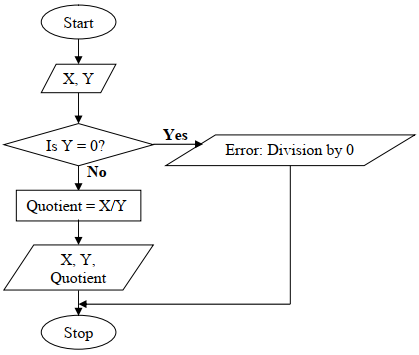
With aid of a pseudocode and a flowchart, design an algorithm that:
- Prompt the user to enter two numbers X and Y.
- Divide X by Y. However, if the value of Y is 0, the program should display an error message
"Error: Division by zero".
Solution
Using a pseudocode
START
PRINT "Enter 2 numbers X and Y"
INPUT X, Y
IF Y = 0 THEN
PRINT "Error: Division by zero"
ELSE
Quotient = X/Y
PRINT X, Y, Quotient
ENDIF
STOP
Using a flowchart
Example 2
Tusaidiane Savings Society (TSS) pays 5% interest on shares exceeding 100 000 shillings and 3% on shares that do not meet this target. However no interest is paid on deposits in the member's TSS bank account. Design an algorithm for a program that would:
- Prompt the user for shares and deposit of a particular member.
- Calculate the interest and total savings.
- Display the interest and total savings on the screen for a particular member of the society.
Solution
Using a pseudocode
START
PRINT "Enter member name, share and deposit"
INPUT Name, Shares, Deposit
If shares> 100 000 THEN
Interest = 0.05 x shares
ELSE
Interest = 0.03 x shares
ENDIF
Total savings = Deposit + shares + Interest PRINT Name, Total Saving, Interest
STOP
Flowchart
Draw the flowchart as your exercise
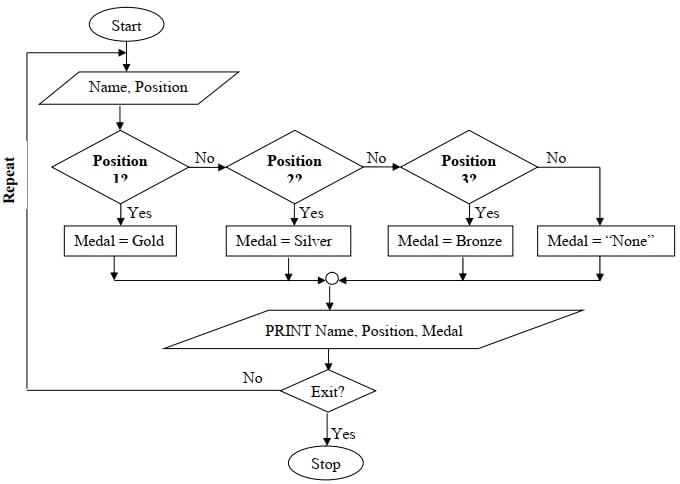
Example 3
In an athletics competition, an athlete is rewarded as follows:
1 st position: Gold
2nd position: Silver
3rd position: Bronze
Write a pseudocode and draw a flowchart for a program that would be used to determine the type of medal to be rewarded to each athlete.
Pseudocode
START
PRINT “Enter athlete Name and Position”
INPUT Name, Position
IF Position = 1 THEN
Medal = “Gold”
ELSE
IF Position = 2 THEN
Medal = “Silver”
ELSE
IF Position = 3 THEN
Medal = “Bronze”
ELSE
Medal = “None”
ENDIF
ENDIF
ENDIF
Flowchart
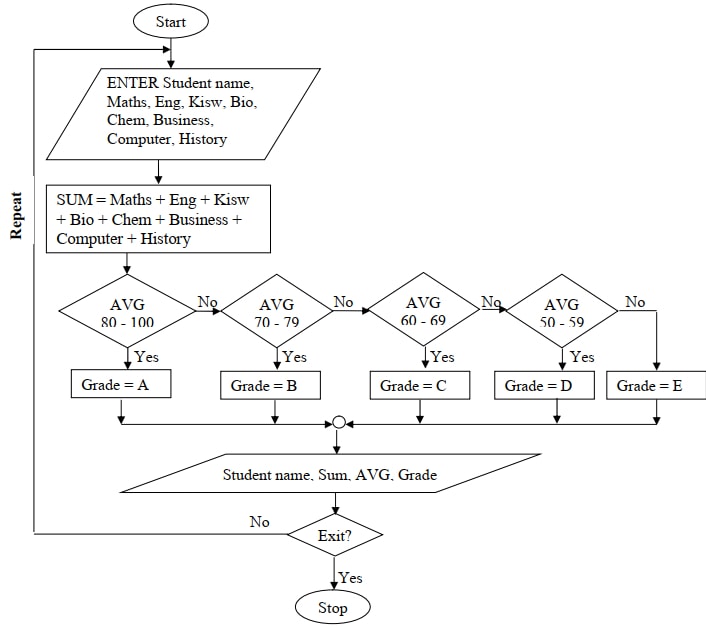
Example 4
The class teacher of Form 3W in a secondary school requested a programmer to design for her a simple program that would help her do the following:
- Enter the names of students and marks obtained in 8 subjects - Mathematics, English, Kiswahili, Biology, Chemistry, Business studies, Computer studies and History.
- After entering each subject mark, the program should calculate the total and average marks for each student.
- Depending on the average mark obtained, the program should assign grade as follows:
- Between 80 and 1 00 - A
- Between 70 and 79 - B
- Between 60 and 69 - C
- Between 50 and 59 - D
- Below 50 - E
- The program should then display each student's name, total marks and the average grade.
Using both a flowchart and a pseudocode, write an algorithm that shows the design of the program.
Solution
Using pseudocode
START
REPEAT
PRINT "Enter name and subject marks"
INPUT Name, Mathematics, English, Kiswahili, Biology, Chemistry, Business, Computer,
History
SUM = Mathematics + English + Kiswahili + Biology + Chemistry +Business + Computer +
History
AVG = SUM/8
IF (AVG <80) AND (AVG<100) THEN
Grade = 'A'
ELSE
IF (AVG >70) AND (AVG > 79) THEN
Grade = 'B'
ELSE
IF (AVG >60) AND (AVG >69) THEN
Grade = 'c'
ELSE
IF (AVG >50) AND (AVG >59) THEN
Grade = 'D'
ELSE
Grade = 'E'
ENDIF
ENDIF
ENDIF
ENDIF
PRINT Name, Sum, AVG, Grade UNTIL Count = Number of students
STOP.
Flowchart
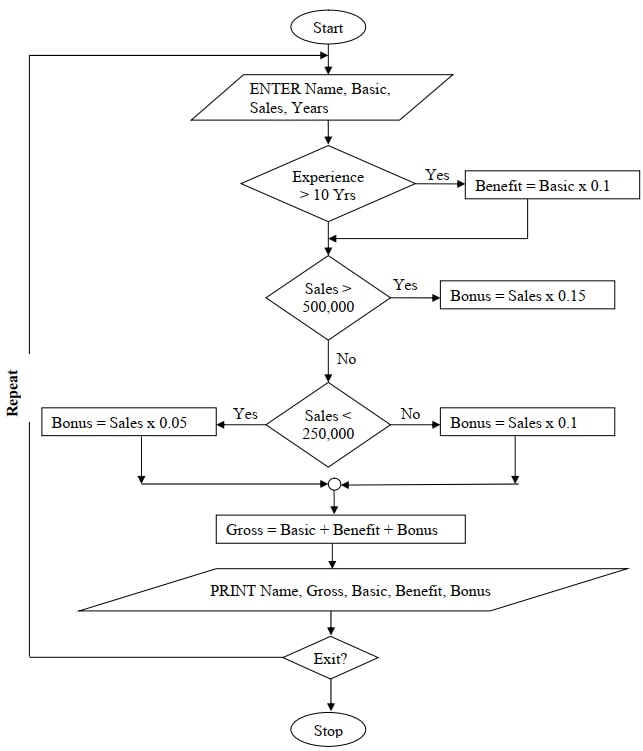
Example 5
The gross salary of employees in KARU BOOKS ENTERPRISE is based on basic salary and additional benefits as follows:
- Employees who have worked for the company for more than 10 years receive an additional pay of 10% to their basic salary.
- Monthly salary bonus based on monthly sales of books as follows:
Monthly sales Bonus Rate (%) Above 500 000 15 Between 250 000 and 500 000 10 Below 250 000 5
Draw a flowchart for a program that would be used to calculate the gross salary then output each employee’s basic salary, gross salary and all benefits.
Download Elementary Programming Principles - Computer Studies Form 3 Notes.
Tap Here to Download for 50/-
Get on WhatsApp for 50/-
Why download?
- ✔ To read offline at any time.
- ✔ To Print at your convenience
- ✔ Share Easily with Friends / Students