DRAWING AND DESIGN (449)
Drawing and Design Paper 1 (449/1)
SECTION A (40 marks)
Answer all the questions in this section on the answer sheets provided.
-
- State two requirements to be observed to avoid confusing the dimension lines with outlines in a drawing.(1 mark)
- Give two reasons why care must be taken when storing drawing instruments.(2 marks)
-
- State what an industrial training centre in Kenya is.(1 mark)
- State two factors to consider in order to produce quality drawing.(1 mark)
-
- State four ways through which design ideas are communicated.(2 marks)
- Sketch the convention for each of the following:
- circular tube;
- planed timber;
- switch;
- knurling.(2 marks)
-
- Give the composition of each of the following alloys:
- brass;
- Stainless steel.(2 marks)
- Figure 1 shows a machine component. (2 marks)
Draw the section D-D.
- Give the composition of each of the following alloys:
-
-
- Explain each of the following scales in relation to the size of the drawing and the actual object.
- 20:1
- 1:20
- Give a common example where each of the above scales would be used.(3 marks)
- Explain each of the following scales in relation to the size of the drawing and the actual object.
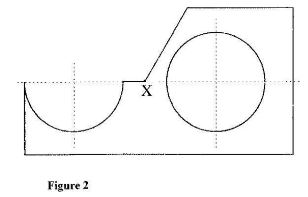
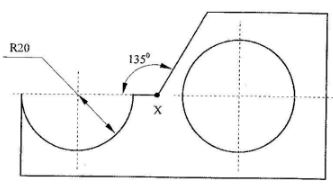
- For the template shown in Figure 2.
Measure and dimension the following:- the semi circle;
- the angle at point X.(2 marks)
-
- Use labelled sketches to differentiate between one-point and two-point perspective drawings.(2 marks)
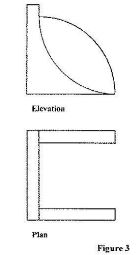
- Figure 3 shows two views of a block drawn in first angle projection.
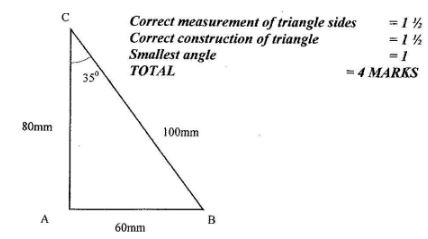
Sketch in good proportion, the oblique view of the block.(3 marks) - Construct a triangle whose perimeter is 240 mm and the sides are in the ratios 4.5:6.0:7.5 measure the smallest angle.(4 marks)
-
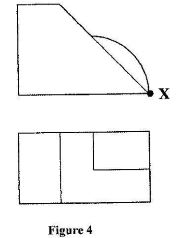
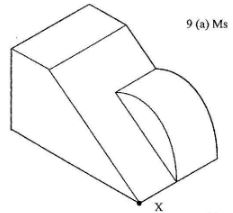
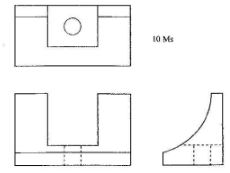
- Figure 4 shows two views of a machined bracket drawn in first angle projection.
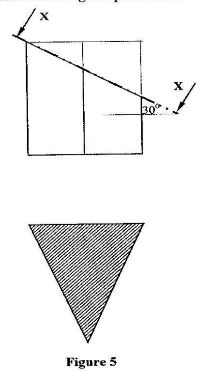
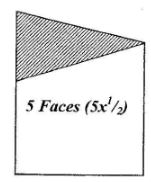
Sketch in good proportion, the isometric view of the block taking X as the lowest point.(3 marks - Figure 5 shows a truncated triangular prism drawn in first angle projection.
Draw the end elevation.(4 marks)
- Figure 4 shows two views of a machined bracket drawn in first angle projection.
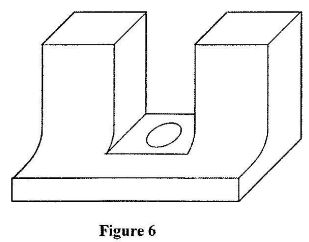
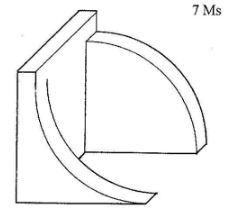
- Sketch in third angle projection the three orthographic views of the block shown in Figure 6.(6 marks)
SECTION B (30 marks)
(COMPULSORY)
Candidates are advised to spend not more than one hour on this question.
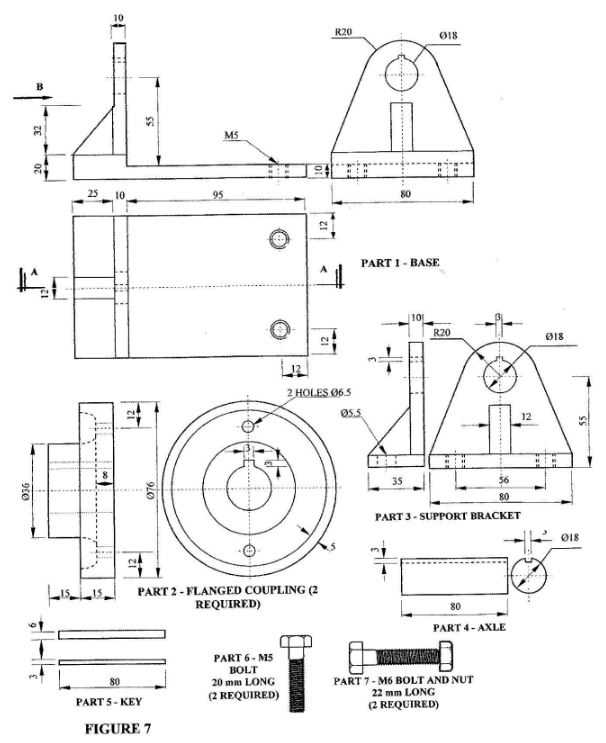
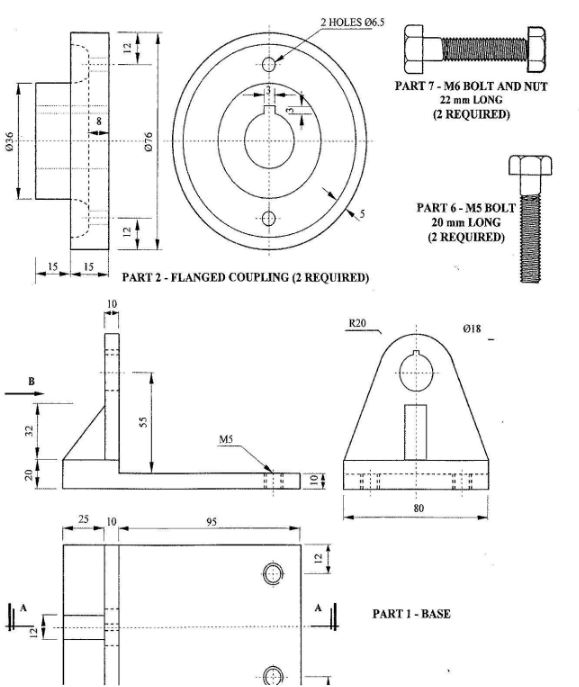
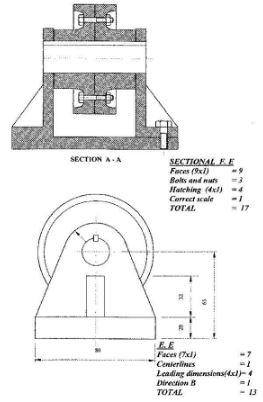
- Figure 7 shows part of a coupling bracket drawn in first angle projection.
Assemble the parts and draw FULL SIZE, the following:- Sectional front elevation along the cutting plane A-A.
- End elevation in the direction of arrow B.
Do not show the hidden details.
SECTION C (30 marks)
Answer any two questions from this section.
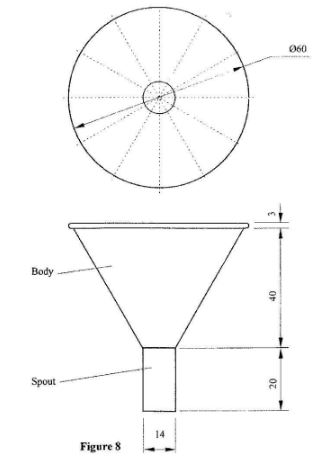
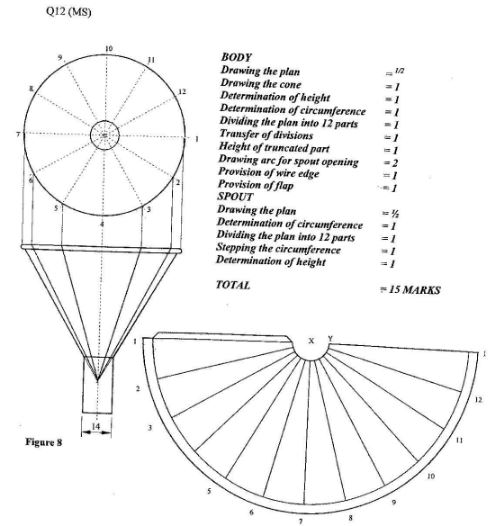
- Figure 8 shows two views of a funnel drawn in third angle projection. The body of the funnel is conical with a wired edge and a cylindrical spout.
Draw the development of:- the body with a 3 mm wire edge;
- the spout (allow 5 mm seam and ignore the thickness of the material).(15 marks)
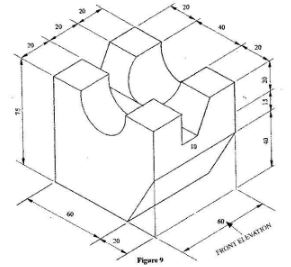
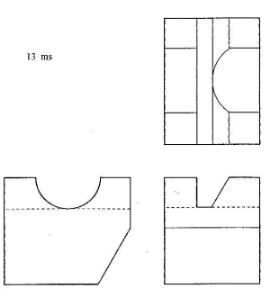
- Figure 9 shows a pictorial view of a machined block.
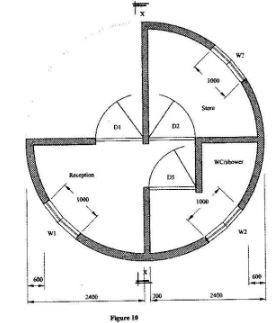
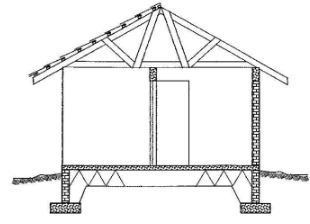
Draw FULL SIZE in third angle projection, the three orthographic views of the block.(15 marks) - Figure 10 shows a plan of a guard house.
Draw section X-X to a scale of 1:50.(15 marks) - Specifications
- Foundation:
- Concrete strip 600 x 200
- Walling:
- 200 mm blockwork
- Flooring
- Ring beam 300 x 200
- Flooring:
- Concrete on hardcore
- Screed on 100 mm concrete
- Roof:
- Pitch 30° covered with concrete tiles on 50 x 25 battens on 100 x 50 rafters.
- Doors:
- D1 steel casement 2000 x 900
- D2 and D3 framed timber 2000 x 900
- Windows:
- W1 steel casement 1600 x 1000
- W2, W3 and W4 1000 x 500
- Foundation:
MARKING SCHEME
-
- Requirements
- Correct thickness of the lines must be maintained.
- Care must be taken in positioning.
- Dimension lines should always have arrow heads.
(any 2 x 1/2) = 1 mark
- Reasons
- To ensure that they maintain their accuracy.
- To avoid physical damage.
(1 mark)
- Requirements
-
- Industrial Training Centres
Are government or NGO institutions which offer marketable skills at artisan and/or craft levels.
(1 mark) - Factors to Consider
- Cleanliness
- Accuracy
- Technique
(any 2 x 1/2) = 1 mark
- Industrial Training Centres
-
- Communicating Design ideas
- Words
- Sketches/ drawings
- Models
- Mock-up/ realia
- Pictures/ photos
(any 4 x 1/2) - 2 marks)
- Conventions
-
- Communicating Design ideas
-
- Composition
- Brass - copper and zinc
- Stainless steel - Iron and chromium
(4 x 1/2 )= 2 marks
Correct view - 1
Hatching - 1
(2 marks)
- Composition
-
-
-
- 20:1 means twenty units on the drawing paper represents one unit of the actual object.
- 1:20 means that one unit on the drawing represents twenty units on the actual object.(2 x 1) = 2 marks
-
- Is applied in magnification e.g tiny parts like radio and clocks.
- Is applied in reduction e.g. house plans, maps e.t.c.(2 x 1/2) = 1 mark
-
-
Dimension of 135º - 1mark
220o - 1mark = 2 marks
-
-
-
-
-
-
-
-
-
- Plan = 9 faces (9 x 1/2) = 4143
Curve = 1
Front = 2 faces (2 x 1/2) = 2
Elev. Connect groove - 1
Smooth curve = 1
End
Elevation = face (1 x1)= 1
Groove = 1
Hidden details = 1
Third angle = 1
projection = 1
Scale= 1
Neatness = 1/2
=15 marks -
Tiles = 1
Battens = 1
Rafters = 1
Ring beam = 1
Wall = 1
Concrete floor = 1
Hard core = 1
Foundation (2x1) = 2
Ground level = 1
Door opening (2x1) = 2
Scale
height = 1
width = 1
pitch = 1
TOTAL = 15 MARKS
(2 x 1) = 2 marks
Download KCSE 2011 Drawing and Design Paper 1 Questions with Marking Scheme.
Tap Here to Download for 50/-
Get on WhatsApp for 50/-
Why download?
- ✔ To read offline at any time.
- ✔ To Print at your convenience
- ✔ Share Easily with Friends / Students


