QUESTIONS
SECTION A (50 marks)
Answer all questions in this section on the answer sheet provided.
-
- Distinguish between technical drawing and artistic drawing.(2 marks)
- State two career opportunities available after studying drawing and design in secondary school.(2 marks)
- Give two reasons for using each of the following:(2 marks)
- Platics in making set squares.
- Blockboard in making drawing boards.
-
- Distinguish between a salary and a wage. (2 marks)
- Figure 1 shows an elevation of a shaped block. Name the lines labelled A, B, C and D. (2 marks)
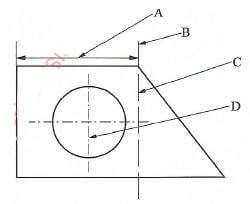
Figure 1
-
- Using the concentric circles method, construct an ellipse whose major axis is 80 mm and minor axis is 60 mm.(5 marks)
-
- Define the following properties of materials:(3 marks)
- Ductility
- Malleability
- Define the following terms as used in drawing:(3 marks)
- Linear mesurements.
- Angular measurements.
- Scales
- Define the following properties of materials:(3 marks)
-
- State four ways through which design ideas are communicated.(2 marks)
- Name two components which can be used to store drawings in soft copy externally.(1 mark)
- Construct a diagonal scale on which 25 mm represent 1 m to read upto 5m. Indicate a reading of 3.68 m on the scale.(6 marks)
- Figure 2 shows a truncated hexagonal prism resting on one of its sides. Draw the end elevation of the prism and the true shape of the cut face.(6 marks)
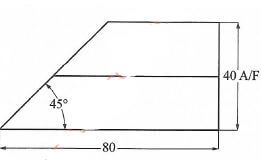
Figure 2 -
- Use sketches to illustrate the following type of sections:
- Revolved section.
- Staggered section.(4 marks)
- With the aid of a sketch of a cube distinguish between one point perspective and two point perspective drawings.(3 marks)
- Use sketches to illustrate the following type of sections:
- Figure 3 shows three views of a block drawn in first angle projection. In good proportion, draw the block in isometric projection with X as the lowest point(7 marks)
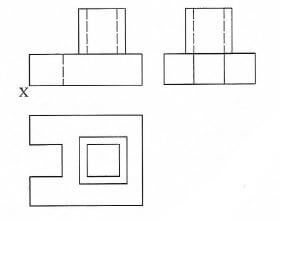
Figure 3
SECTION B (20 marks)
This question is compulsory.
It should be answered on the A3 paper provided.
Candidates are advised not to spend more than one hour on this question.
- Figure 4 shows parts of a pulley support bracket drawn in third angle projection.
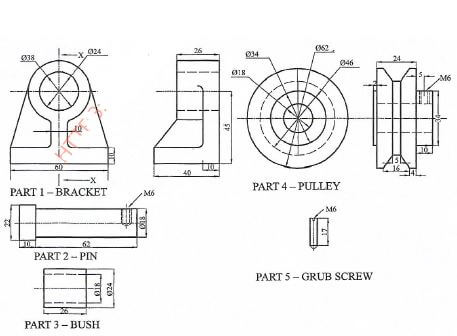
Assemble the parts and draw Twice Full Size the following views in third angle projection:(20 marks)- Section X-X.
- End elevation.
SECTION C (30 marks)
Answer any two questions from this section on the A paper provided.
- Figure 5 shows three orthographic view of a bracket drawn in first angle projection
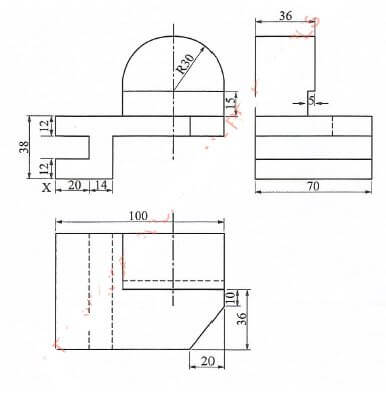
Figure 5
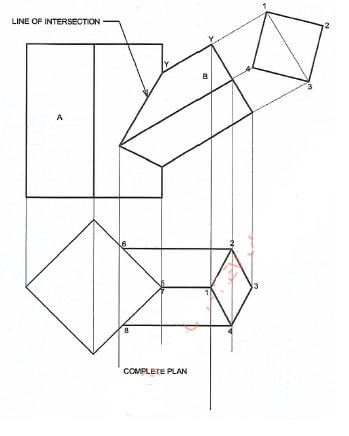
Draw the bracket in isometric projection taking X as the lowest point.(15 marks) - Figure 6 shows two square tubes A and B intersecting at an angle of 30°.
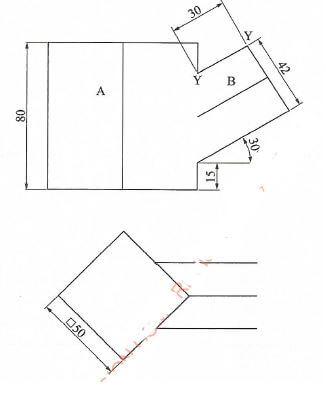
Figure 6
Draw the following:(15 marks)- Complete front elevation showing the line of intersection
- Complete plan
- Surface development of tube B when opened along Y-Y
- Figure 7 shows a wheel whose diameter is 60 mm, rotating along a flat surface without sliding.
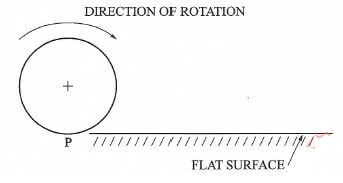
Figure 7
Plot the path followed by point P on the wheel, through one complete revolution.(15 marks)
MARKING SCHEME
-
- Technical drawing uses drawing instruments to produce conventional drawings of objects, while artistic drawings are drawn to the impression of the artist, without the use of conventions.
Technical drawings are produced to scale using drawing instruments while artistic drawings show philosophical abstract ideas or emotions of the artist. - Career opportunities available after studying Drawing and Design:
- Manufacturing industry.
- Draughtsmanship in designing buildings and structures.
- Construction industry.
- Aeronautical Engineering
- Architecture
- Teaching in the technical institutions.
Accept any other correct response 2 mark)
- Technical drawing uses drawing instruments to produce conventional drawings of objects, while artistic drawings are drawn to the impression of the artist, without the use of conventions.
-
- Reasons for using plastics in making set squares :
- They are light in weight.
- Numbers and letters can easily be engraved on them clearly
- It can be shaped into various different shapes.
- They are durable
- They do not rust even when subjected to moisture.
- Reasons for using block boards in making drawing boards:
- They are firm (cannot warp easily), strong & stable
- They can easily be worked on with hand tools to give the desired finish
- Have a smooth finish.
- They provide a larger surface area
- They have no defects
- Reasons for using plastics in making set squares :
-
- A salary is fixed payment made by an employer often monthly for professional or office work which is taxable, while a wage is payment made in return for work or services by workers at agreed time and is not taxable.
- A-Dimension line.
B-Extension line/projection line.
C-Hidden detail line.
D-Centre line.
-
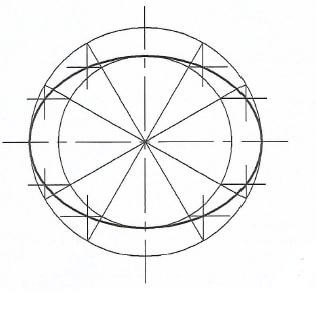
Drawing circles 80 and 60 mm-1 mark
Dividing the circle into 12 divisions-1 mark
Vertical lines from points on the bigger circle-1 mark
Drawing horizontal lines from points on the smaller circle-1 mark
Joining the points where lines meet-1 mark -
- Ductility is the ability of a material to be drawn into thin wires without breaking i.e. being stretched cold without breaking malleability is the ability of a material to be hammered, bent shaped and rolled into various shapes without breaking i.e. Ability of a material to be rolled into thin sheets without breaking.
-
- Linear measurements are obtained directly from flat surfaces where two points are joined by a straight line.
- Angular measurement is the degree of separation between two surfaces or lines from a common point. i.e It is the measurement of angles
- Scale is the ratio between the length of a line on the drawing and the actual size of the object.
-
- Ways of communicating design ideas.
- Words/notes
- Sketches
- Working drawings
- Exploded drawings
- Models or mock-ups/prototypes
- Pictures photographs
- Videos
- Two components used for storing drawings in soft copy:
- A flash disc
- A compact disc/magnetic tape
- A memory card
- Magnetic strip
- CD or flash disk
- Ways of communicating design ideas.
- Representative Fraction (R.F.) = 25
1000
Length of scale = R.F. x maximum length
= 25 x 5000 = 125mm
1000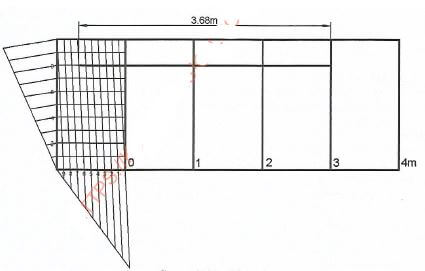
- Correct R.F. = 1/2 mark
- Correct length of scale = 1 mark
- Drawing and marking 125mm = 1 mark
- Dividing 125mm into 5 divisions = 1/2 mark
- Dividing the first part into 10 divisions = 1/2mark
- Dividing the breadth into 10 divisions = 1/2mark
- Drawing the diagonals = 1 mark
- Showing the distance of 3.68m = 1 mark
-
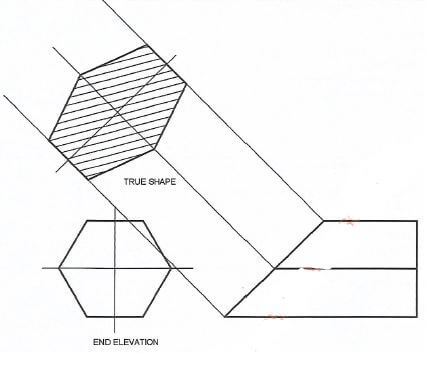
End-Elevation- Drawing the circle whose diameter = A/F = 40mm = 1 mark
- Drawing the hexagon around the circle = 1 mark
True shape - Perpendicular projections = 1 mark
- Transfer of comer points from end elevation = 1 mark
- Joining the points = 1 mark
- Hatching the true shape 1 mark
Total = 6 marks
-
-
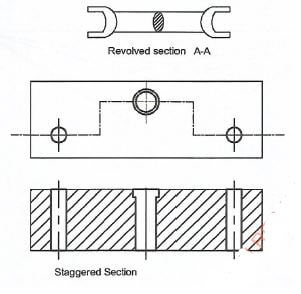
Accept any other correct alternative given. -
-
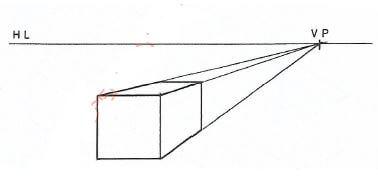
Here there is one varnishing point. The horizontal lines on the cube are all parallel to the plane of projection.
Sketch mark = 1 mark
Explanation = 1/2 mark
Total = 11/2 mark -
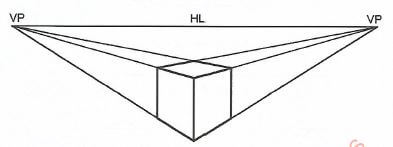
Two point perspective
Here there are two vamishing points. All horizontal lines converge towards the varnishing points.
Sketch mark = 1 mark
Explanation = 1/2 mark
Total = 11/2 mark
Accept other alternatives if given with the HL and VP at different positions.
-
-
-
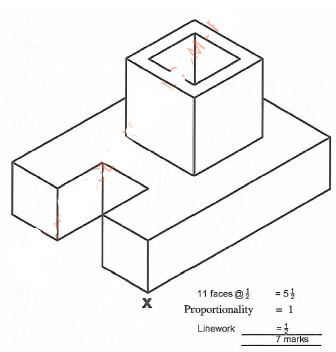
-
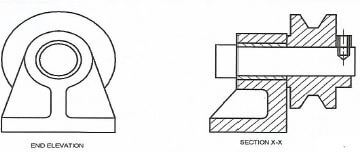
Accept solution the end elevation is drawn with a square head screw -
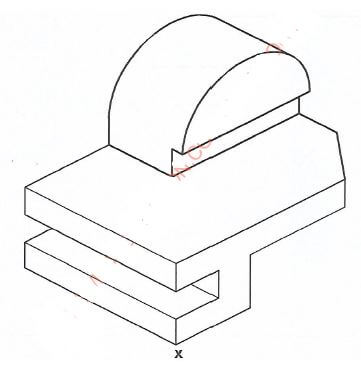
M/S
9 faces @1 = 9
2 curves @ 11/2 = 3
Point x @ 1 = 1
Isometric @1 = 1
Linework/neatness = 1
15 marks -
-
-
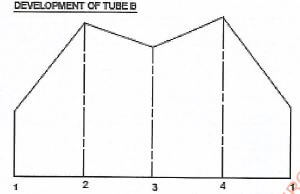
M/S
Transfer of the figure 2 x 11/2 = 3
F/Elevation
Plotting the point of intersection=1
Completing the lines of intersection = 2
Plan
Projections from F/elevation = 2
Plotting the points = 1
Joining the points = 1
Development
Perimeter = 1
Transfer of height = 1
Drawing of curve = 1
Folding lines = 1
Linework/Neatness = 1
15 marks
Accept the solution if the development is projected directly from tube B
-
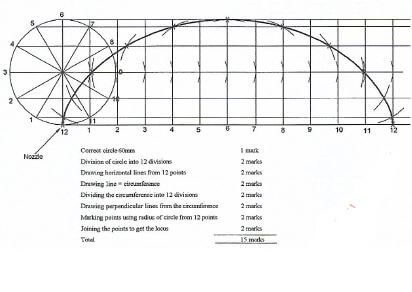
M/S- M/S - Correct circle Ø 60mm = 1 mark
- Division of circle into 12 divisions = 2 marks
- Drawing horizontal lines from 12 points = 2 marks
- Drawing line = circumference = 2 marks
- Dividing the circumference into 12 divisions = 2 marks
- Drawing perpendicular lines from the circumference=2 marks
- Marking points using radius of circle from 12 points=2 marks
- Joining the points to get the locus 2 marks
15 marks
Download KCSE 2018 Drawing and Design Paper 1 with Marking Scheme.
Tap Here to Download for 50/-
Get on WhatsApp for 50/-
Why download?
- ✔ To read offline at any time.
- ✔ To Print at your convenience
- ✔ Share Easily with Friends / Students
