QUESTIONS
SECTION A (50 marks)
Answer all the questions in this section in the spaces provided.
-
- Give two reasons for engineers to study technical drawing.
- State four uses of computers in technical drawing.
-
-
- State two methods of sharpening pencil leads.
- Give the reason for rotating a pencil when drawing.
- Sketch the symbols used for each of the following conventions in drawing
- Splined shaft
- Internal screw thread
-
-
- List four mechanical properties of metals (2 marks)
- List four requirements necessary for starting a small business. (2 marks)
- Define each of the following terms as used in the design process
- Secondary objective
- Realisation (2 marks)
- Construct the involute of a square of side 30 mm. (5 marks)
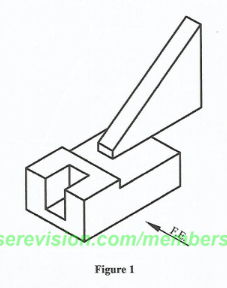
- Figure 1 shows a block drawn in isometric projection. Draw in good proportion the following views in third angle projection:
- The front elevation
- The plan
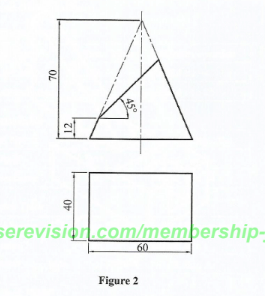
- Figure 2 shows an elevation and an incomplete plan of a truncated rectangular pyramid drawn in first angle projection.
- Copy the elevation.
- Complete the plan.
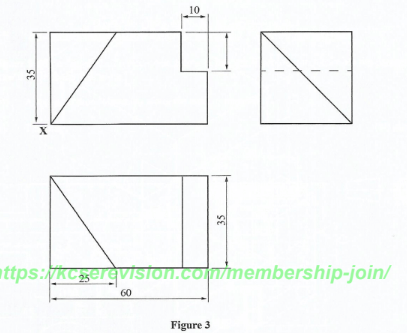
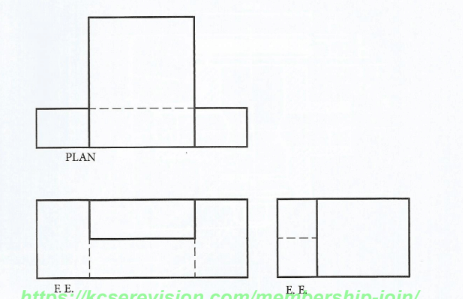
- Figure 3 shows three views of a shaped block drawn in first angle projection. Draw the block in isometric projection taking X as the lowest point.
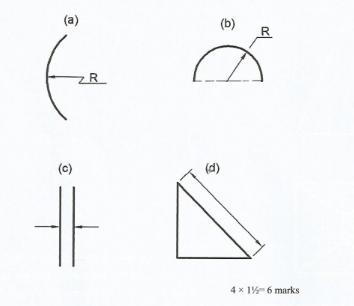
- Illustrate methods of dimensioning each of the following features:
- Large res
- Semi-circle
- Small gaps
- Slope (6 marks)
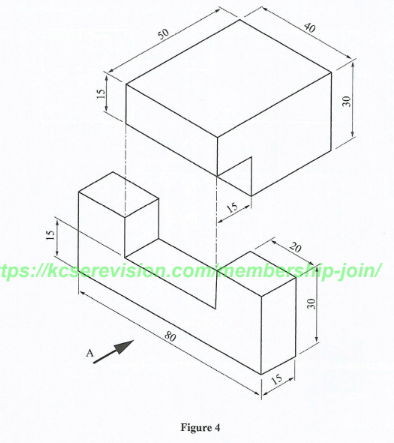
- Figure 4 shows an exploded view of a joint. Assemble the parts and draw full size the three orthographic views of the joint, in third angle projection.
SECTION B (20 marks)
This question is compulsory.
It should be answered on the 43 paper provided
Candidates are advised to spend not more than 1 hour on this question
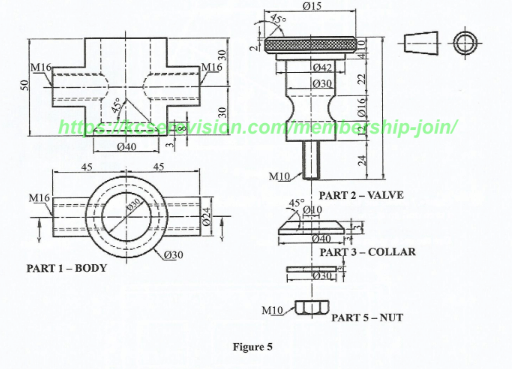
- Figure 5 shows the parts of a stop cock drawn in first angle projection. Assemble the parts and draw Full Size the following
- A sectional front elevation along the cutting plane Y-Y
- The plan
SECTION C (30 marks)
Answer any two questions from this section on the A3 paper provided.
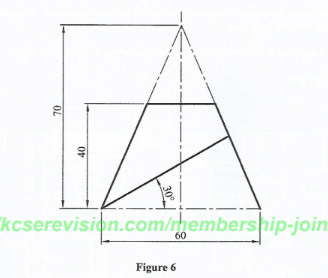
- Figure 6 shows a cone truncated at the top and bottom. Copy the figure and draw the surface
- Figure 7 shows the front view of a house. Construct a diagonal scale in which 20 mm represent
Im to read up to 5 m
Use the scale to draw the view of the house.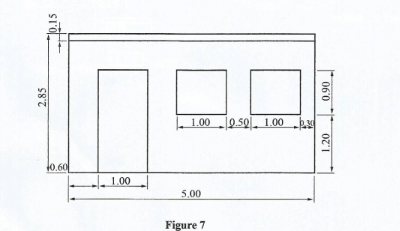
(15 marks) - Figure 8 shows three orthographic views of a block drawn in first angle orthographic projection.
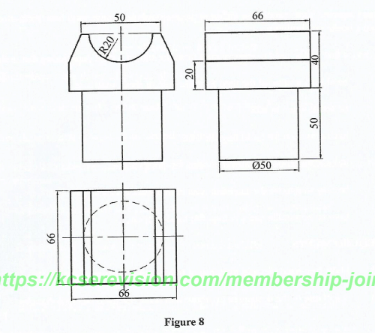
Draw the isometric view of the block. Include hidden details.
(15 marks)
MARKING SCHEME
-
- Solution
- Interpret engineering drawings
- Design projects
- Appreciate drawings
- For draughting or design
- Reference/research
- Storage of drawings
- Editing drawings
- Sharing disseminating information
- Display/view
- Solution
-
- Solutions
-
- Conical pointed
- Chisel
Any 4x2 marks
- To maintain uniform intensity of the line
-
-
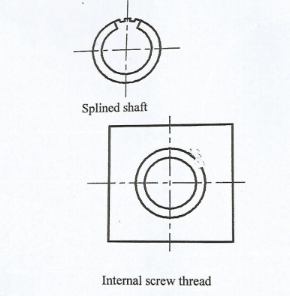
- Solutions
-
-
- Malleability
- Hardness
- Toughness
- Strength
- Brittleness
- Ductility
- Plasticity
- Elasticity
- Fusibility
-
- License
- Capital
- Premises
- Business plan
Accept any other correct requirement
-
-
- Secondary objective refers to the value addition to a designed ob ject e.g. comfort, aesthetics value e.t.c
- Realization is the process making of a real object from the working drawing (Actualization of the design)
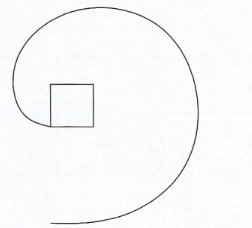
Square drawn with correct dimensions-1 mark
Tangents drawn from 4 sides-4x 1⁄2 marks
Smooth curve of the involute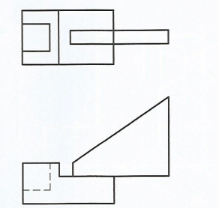
Correct angle of projection-1 mark
Correct front elevation - 3 marks
Correct plan with hidden details-3 marks
Total - 7 marks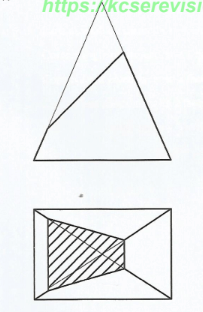
Elevation copied correctly. I mark
5 faces of plan with hatching- 3 marks
Total 4 marks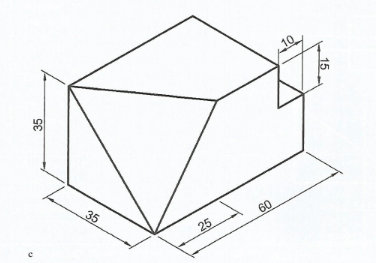
Correct isometric of projection-1 mark
5 faces drawn correctly -5 marks
Total = 6 marks-
Parts assembled correctly- 1marks
Correct angle of projection=1 mark
Correct front elvation with 2 faces-2x-1 mark
Correct end elevation with 2 face-2×1⁄2=1 mark
Correct plan with 3 faces-3x-1⁄2 marks
Total = 6 marks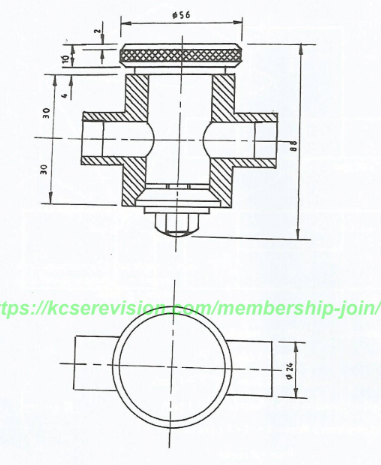
Correct angle of projection-1 mark
Right scale used for drawing-1 mark
SECTION Y-Y
Correct assembly 4 marks
Correct knurling -1 mark
Correct hatching for 4 faces-4 x 1-4 marks
Correct representation of threads I mark
Hexagonal nut drawn correctly -2 marks
2 centerlines drawn correctly -- 2 x 1⁄2 = 1 mark PLAN
4 faces -4x=2 marks
2 centerlines-2-1 mark
Correct use of lines -2 marks</br<>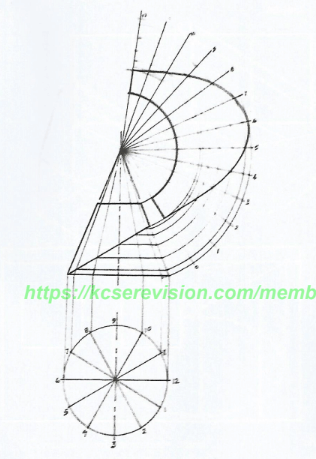
Copying the figure-1 mar Drawing the plan- 1 mark
Dividing the plan into 12 divisions-2 marks
Projecting from plan to elevation - I mark
Projecting from elevation base to the tip-1 mark
Projecting from top part of cut face to edge-1 mark
Projecting from bottom part of cut base to surface development - 1 mark
Plotting point on surface development -1 mark
Plotting bottom points on the development-2 marks
Complete development
Linework
Neatness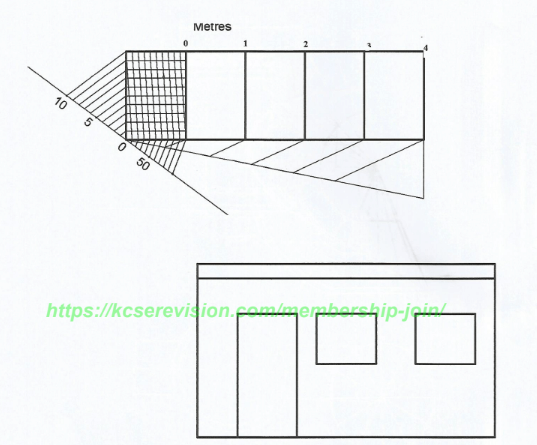
Length of scale I mark
1st divisions 1 mark
Accuracy = 1 mark
2nd divisions - I mark
Diagonal divisions 1 mark
Complete scale=1 mark
Transfer of 11 dimensions 11 1⁄2-5 1⁄2 marks
Completing figure -2 mark
Linework and neatness -1 1⁄2
Total 15 marks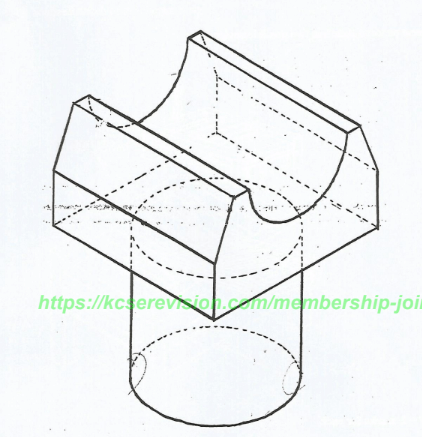
Correct isometric projection-1 mark
7 faces -7 x 1-7 marks
3 isometric circles-31-3 marks
Hidden details included -1 mark
Correct position of base = 1 mark
Linework and neatness-2 marks
Total - 15 marks</br<>
Download Drawing And Design Paper 1 Questions and Answers - KCSE 2022 Past Papers.
Tap Here to Download for 50/-
Get on WhatsApp for 50/-
Why download?
- ✔ To read offline at any time.
- ✔ To Print at your convenience
- ✔ Share Easily with Friends / Students
